According to Statista, Facebook has more than 2.27 billion active monthly users. Eventually, each of those users will pass away. But what happens to Facebook after you die? Does the account get deleted? Does it just sit there dormant for people to post messages or photos the account holder will never see? Or does Facebook do something else entirely?
The simple answer to all of these questions is yes.
Up until 2015, friends and family only had a few choices when it came to the deceased’s Facebook page. Back then, you could contact Facebook and have them delete the page, you could have it memorialized, or you could do nothing and the account would just sit inactively.
None of these really seemed like great options. If you deleted the page, you lost all of the photos and memories your loved one shared online. If you left the account inactive, people would get painful reminders of things like anniversaries, birthdays, and past memories. Finally, if you had the page memorialized, the account would be frozen and no longer appear in searches.
That’s why Facebook introduced the legacy contact. A new way to manage a Facebook account for someone who has died.
The legacy contact allows you to designate a member of your friends list to have access to your account. Once Facebook has been notified of the death, the legacy contact will be notified by Facebook. The legacy contact then receives limited access to your page. They won’t be able to read your private messages, but they can respond to friend requests, update your profile and cover photos, archive your Facebook posts, and pin a final post to the top of your timeline.
The legacy contact is great because it allows families the chance to preserve their loved one’s memories and photos. In a statement released by Facebook, they said this of the legacy contact: “By talking to people who have experienced loss, we realized there is more we can do to support those who are grieving and those who want a say in what happens to their account after death,”.
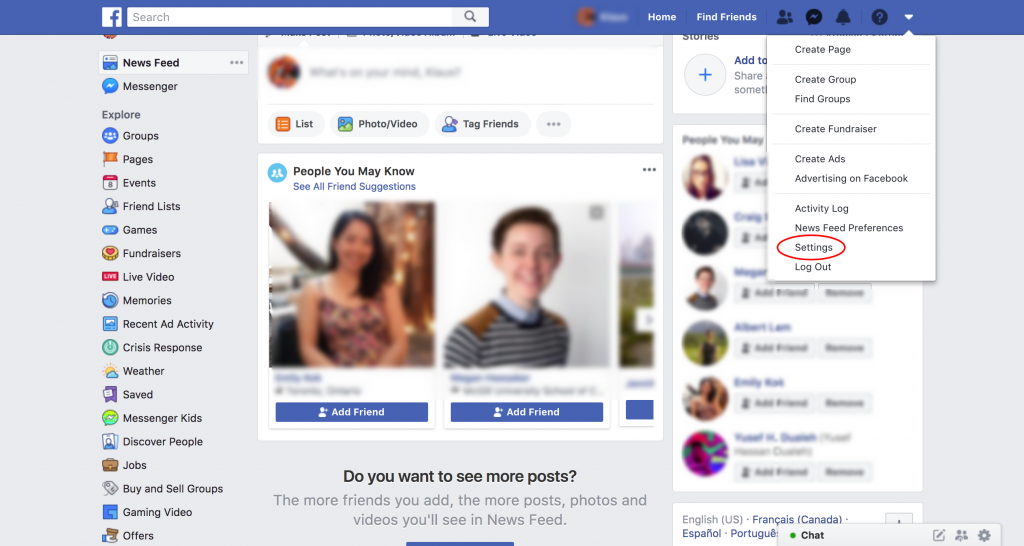
Setting up your Facebook legacy contact is fairly easy and straightforward. The first thing you need to do is click on the drop-down menu on the right side of the page and select settings.

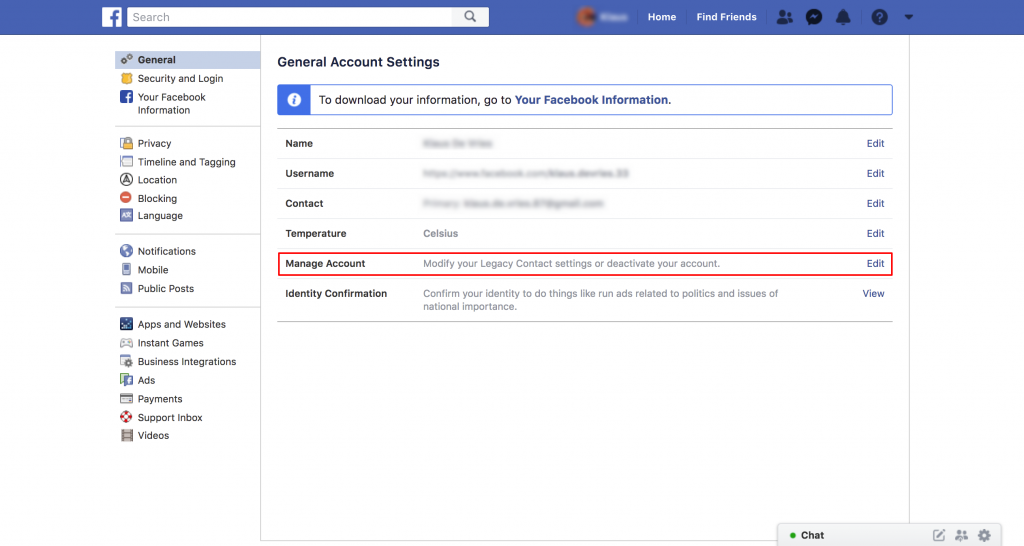
Once you are on the settings page, you will need to click on “Manage Account”.

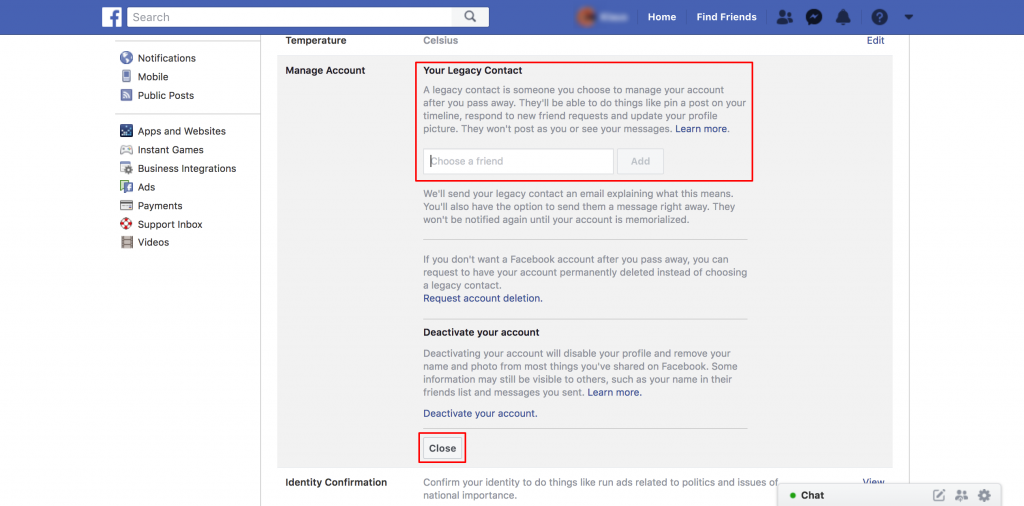
Once you’ve clicked on manage account, the section will drop down and enable you to add your legacy contact. Simply enter the name of your legacy contact in the blank field and click on their account as it pops up. Once complete, click close at the bottom of the section and you will have successfully set up your Facebook legacy contact.

*Disclaimer
At the time of publishing, this is the correct way to set up a legacy contact. Facebook may or may not change the layout of user accounts in the future. If the process is changed, we will do our best to update the following steps for setting up a Facebook legacy contact.
Before you set up your Facebook legacy contact, there are several things to consider. The first being, who you want to list as your contact. Your legacy contact should be someone you can trust to manage the account. Before listing someone, make sure to speak with them and make sure that this is something they are ok with.
Another important thing to consider is your other social media accounts. Although Facebook owns Instagram, your legacy contact will not have access to your Instagram account. Instagram does not currently have a legacy contact feature. However, a family member can verify their identity and contact Instagram to have the account memorialized.
Other social media accounts like Twitter do not offer a memorialization feature and have their own policies for deleting social media accounts for someone who has died. In most cases, a family member will need to verify their identity before showing a death certificate and other necessary documents.
This entry was posted in Funeral Planning Resources on November 27th, 2018 by ObitTree .
ObitTree.com is the obituary engine of the National Obituary Registry and a hub for all things death care.
View all posts by ObitTree